Dynamics AX2012 SQL Dictionary challenges when restoring database to another environment

All Dynamics AX customers restore transaction database from one environment ( e.g. Production environment ) to another ( e.g. Test environment)

There are situations when the object IDs in the Model database of the two environments do not match  resulting in issues such as data loss during the synchronisation.

I stumbled on the Johan’s blog post (reference at the end of this post) to find a light on how to address these challenges quickly. It provided a good start but we required to change the script to suite the special situation when transnational database is restored from a production to non production environment and objects IDs do not match between the two applications

/*
Only to update the SQL dictionary records before the synchronisation after the database restore . No new record in SQL dictionaty will be created through this job.
This will only update existing Ids in the SQL dictionary to match the Model store Ids
Objects that are new in AOT will get created in SQL dictionary when synchonisation happens

**USE AT YOUR OWN RISK**

** Please Change database Name to your own DB names when testing the following script and DB collation **

Case 1 –  Table Name matches but table ID is different – Need to fix table ID in SQL dictionary where fields ID is 0 and !0 for such table names
Case 2 – Field Ids name matches but field Id(s) are different – Need to Fix Field IDs in SQL dictionary to match AOT

step 1 – update tableid on tables and fields. Update SQL dictionary mismatched IDs = (ID in AOT)*(-1). Then change the negatives to Postives
step 2 – fieldid on fields Updated negative entry from 1 and 2 to positive. Update SQL dictionary mismatched IDs = (ID in AOT)*(-1).
Then change the negatives to Postives

*/


USE AX2012TestDB
GO
— Backup the existing SQL dictionary as precaution
select *
into AX2012TestDB.dbo.SQLDICTIONARYBKP
from AX2012TestDB.dbo.SQLDICTIONARY

USE AX2012TestDB_Model
GO

–Step 1 Find tables in SQLDICTIONARY that have same name as in AOT but different ID and then update = ModelstoreID in SQLDICTIONARY for Table and fields records
With t as (SELECT m.ElementHandle,m.NAME mName,m.AxId,md.LegacyId,s.TABLEID,s.NAME sName,s.SQLNAME
FROM modelelementdata md,ModelElement m
LEFT OUTER JOIN AX2012TestDB..SQLDictionary s
ON upper(m.NAME) collate Latin1_General_CI_AS = s.NAME
WHERE m.ElementType = 44
AND m.elementhandle = md.elementhandle
AND s.ARRAY = 0
AND s.FIELDID = 0
AND s.TABLEID != m.AxId
)


–Update to correct * -1
update AX2012TestDB.dbo.SQLDICTIONARY
set TABLEID = (t.axid * -1)
from t
join AX2012TestDB.dbo.SQLDICTIONARY s
on t.tableid = s.tableid
go

–verify SQLDICTIONARY that have negative IDs for change to positive
with t as
(SELECT m.ElementHandle,m.NAME mName,m.AxId,md.LegacyId,s.TABLEID,s.NAME sName,s.SQLNAME
FROM modelelementdata md ,ModelElement m
LEFT OUTER JOIN AX2012TestDB..SQLDictionary s
ON (s.TABLEID * -1) = m.AxId
WHERE m.ElementType = 44
AND m.elementhandle = md.elementhandle
AND s.ARRAY = 0
AND s.FIELDID = 0
AND upper(m.NAME) collate Latin1_General_CI_AS = s.NAME
)
— Update to positive
update AX2012TestDB.dbo.SQLDICTIONARY set TABLEID = (TABLEID * -1) where AX2012TestDB.dbo.SQLDICTIONARY.TABLEID < 0

go

— Step 2 Fix the field ids in SQLDictionary which do not match with Model
with t as (SELECT (SELECT m1.NAME
FROM ModelElement m1
WHERE m1.ElementHandle = m.ParentHandle
) AS ‘Table Name’,m.NAME AS ‘mName’,m.AXid,s.RECID,M.ParentId,s.TableId,s.FIELDID,S.NAME,s.SQLNAME
FROM ModelElement m
LEFT OUTER JOIN AX2012TestDB..SQLDICTIONARY s ON m.ParentId = s.TABLEID
AND s.NAME = upper(m.NAME) collate Latin1_General_CI_AS
WHERE m.ElementType = 42
AND (s.ARRAY = 1 OR s.ARRAY IS NULL)
AND (s.FIELDID > 0 OR s.FIELDID IS NULL)
AND s.FIELDID != m.AxId
)
— First set to a negative number but correct ID
update AX2012TestDB.dbo.SQLDICTIONARY
set FIELDID = (t.axid * -1)
from t join AX2012TestDB.dbo.SQLDICTIONARY s
on upper(t.mName) collate Latin1_General_CI_AS = s.NAME
and s.FIELDID <> 0
and s.TABLEID = t.ParentId
go

–Reverse the negative to positive
update AX2012TestDB.dbo.SQLDICTIONARY
set FIELDID = (FIELDID * -1)
where FIELDID < 0
go

Reference :http://daxjohan.blogspot.com.au/2015/01/ax-2012-r2-fix-sqldictionary.html

Dynamics AX 2012 Resolve SQL dictionary mismatch when refreshing Database


Posted in Dynamics AX, Dynamics AX 2012, SQL Backups, Uncategorized | Tagged , , | Leave a comment

Hello world!

Welcome to WordPress.com. This is your first post. Edit or delete it and start blogging!

Posted in Uncategorized | 2 Comments

AX2009 Deleting the ordered reserved Purchase line
This time it is not solution but i am highlighting a problem / a bug to sound the AX consultants’ community.There are two parts of this problem depending upon the Inventory model group setup .

Common setup :

a. The Inventory Management Parameter for "InventParameters.ReserveOnOrdered" = Yes

b. The accounts recievable Parameter for "SalesParameters.Reservation" = Yes .i.e. Reservation in AR parameters is set as "Automatic"

c. The Item Under testing has no Transactions in the system before the test.

Case I – When an item’s Inventory Model Group has "InventModelGroup.NegativePhysical" = Yes
Steps to Follow :

1. Create new Item with inventory model group attached to it which has "InventModelGroup.NegativePhysical" = Yes.

2 Create a Purchase order for the Item e.g. for Qty = 100.

3. Save the PO and Exit the purchase order form.

4. Create a Sales Order for the item for Qty e.g. 70.

5. Check the reservation status of the Sales line. It should be "Reserved ordered" .

6. Open the Purchase order and delete the purchase order created in step 2 above. Purchase order gets deleted.

7. Open the inventory transaction for the Item created in step 1 above . There will be only one record for the sales order created in step 4 above.

8. Verify the Issue status . Phew Its still "Reserved ordered". Against which receipt? should have been updated to "On order" state.

In step 8 above, the issue transaction should have been updated to "On order" state as there is no receipt transaction for the item.

Case II – When an item’s Inventory Model Group has "Allow Physical negative inventory" = "No"

Steps to Follow :

1. Create new Item with inventory model group attached to it which has "InventModelGroup.NegativePhysical" = "No".

2 Create a Purchase order for the Item e.g. for Qty = 100.

3. Save the PO and Exit the purchase order form.

4. Create a Sales Order for the item for Qty e.g. 70 at the same inventory dimensions as of teh purchase order created in step2 above.

5. Check the reservation status of the Sales line. It should be "Reserved ordered" .

6. Open the Purchase order and delete the purchase order created in step 2 above. Purchase order line cannot be deleted.

7. Infolog "There are transactions with status Reserved ordered for the dimension of the itemXXXX.Update has been cancelled".

8. reduce the purchase order line to zero. The system allows this.

9. Open the inventory transaction for the Item created in step 1 above . There will be only one record for the sales order created in step 4 above.

10.Verify the Issue status . Phew Its still "Reserved ordered". Against which receipt? should have been updated to "On order" state.

Since by mere deleting the expected receipts of the item the physical inventory cannot go negative therefore this validation is not right.

Note : The system allows reduction of the purchase order quantity to e.g zero but would not allow the deletion of the line.. huh

Apparently, Microsoft development team is working on the above and we would soon hear from them . Until then , pls handle such situations on your respective implementations as this may cause problems in planning.

Stay tuned……………

Posted in Dynamics AX, AX2009 | 3 Comments

AX2009 Misc Charges

Almost all of implementations have the Misc charges and Auto misc charges used in the AR and AP. Recently , I noticed a strange behaviour when i was using this feature in one of the implementation. This is related to the Misc charges with category “Percent”. We will take an example of Misc charge on a purchase transaction to understand the issue

Consider that there is an item on which  a 5 % duty is applicable on the net amount of the purchase. Therefore, consultants would like to utilize the ‘Auto misc charges’ feature for mapping this business requirement.

Let’s first create a Misc charge code e.g. “Duty’ as shown in the following screen shot:

The Misc charge has been created with the following posting setup:

i.e. the cost of the misc charge is to be loaded on the inventory value and offset to a Misc charge suspense account.

You may also notice that the Company currency is USD in the environment in which this simulation is being done. Consider that a Purchase order is raised in EUR on a vendor

Att this stage , if the Duty was configured in the Auto misc charges then it would flow on the lines else we can manually configure a misc charge for the purchase lines that duty of 5% payable in USD ( as we are buying from an overseas vendor in EUR but would pay ‘duty” to customs in USD) . The sales line misc charge would be as follows

Now , when we invoice update the purchase order and see the voucher of the invoice posting

The misc charge amount got calculated 5% of EUR 10,000 as USD 500.  Therefore for those consultants/users who rightly disagree with this logic of calculation , the setup and configuration should be done with the above in mind.

To understand the effect for comparison purpose consider that the same item is bought from a vendor in India and the order is placed in INR. The exchange rate conversion for INR is 1 EUR = INR 80 . Therefore the Purchase order is placed for 5000*80 = INR 400,000.00 . The purchase line is also having the 5% duty as a misc charge .

Follow the steps for processing purchase order and invoice it . Check the invoice and the voucher:

Pls notice that this time the duty paid is USD 2000.00 as against the previous example of USD 500.00 (even that was not correct) .

Can one believe that for the same value of the item in the company currency just by changing the currency of the purchase order we could have ended up paying 4 time the cost of the item as duty?

Apparently Microsoft’s development team is working on this bug and we may hear some fix on the above.


Stay tuned………

Posted in Uncategorized | 2 Comments

AX 2009 Customer payments Part – 1

In all of the implementations we talk about the Method of payments and terms of payment to be used when processing customer payments. The most common payment terms fall under the categories that a sales order is invoiced and customer sends payment against the invoice by the due date.

In many cases where a cash sales is processed ( sometimes called counter sale) then it is expected that as soon as the invoice is posted , the system should process a payment journal for the sale to reduce the burden of the people posting the sale. Microsoft dynamics AX 2009 has a solution which is not so well known . This article is to help the consulting community (especially the new consultants) on this feature. The solution is in method of payments .

1. Method of payments : Create a method of payment e.g. ‘Cash’

Account type – Select  “Bank”.

Payment account – Select the bank account to deposit the money into.

Bank transaction type – Select the bank transaction type which is of name deposit to identify the deposit.

2. Go to ‘File formats’ tab.


The following highlighted fields are of our interest.

Automatic posting – Mark the Automatic posting.

Name – Select a customer payment journal.

The use of such method of payment ignores the due date calculated through the terms of payment and posts the payment journal immediately after posting the invoice.

For cash payment processing, a Free text invoice or a sales invoice may be used .

3. Option 1 : Free text invoice

Create a free text invoice .

Use the method of payment = Cash as created above

Post the free text invoice . A payment journal for the invoice amount is also gets posted.

Check the customer transaction . The invoice and the payment transaction posted and settled are show below for reference.

Option 2 : Sales order posting for cash sales.

Create a sales order and choose the method of payment as ‘cash’ as created above . Do not select any payment terms .

Post the invoice

Check the customer transactions : The highlighted transaction below shows invoice and the payment voucher posted for this transaction and settled.


In our next posts we would see the use of some more options on payment processing. Stay tuned………

Posted in Dynamics AX, AX2009 | 4 Comments

Dynamics AX 2009 ; Useful ‘build’ information and links


Following table has the build information for the Microsoft dynamics AX2009 . Under the comments section there are link to the Microsoft’s partner source for getting more information about the links to download the hotfixes/ service packs .

Pls note that one would need to have the microsoft partner source login credential to use the hyper links provided.

Kernel rollup is the latest in the series for AX2009 SP1.

Axapta version

Kernel build

Application build

Comments

Dynamics AX 2009 RTM

5.0.593.0

5.0.593.0


Dynamics AX 2009 RTM Hotfix

5.0.593.xxx

5.0.593.xxx


Dynamics AX 2009 RTM RU-1

5.0.593.439

5.0.593.439

Rollup 1

Dynamics AX 2009 RTM RU-2

5.0.593.662

5.0.593.662

Rollup 2

Dynamics AX 2009 RTM RU-3

5.0.593.827

5.0.593.827

Rollup 3

Dynamics AX 2009 SP1

5.0.1000.52

5.0.1000.52

Service Pack 1

Dynamics AX 2009 SP1 Hotfix

5.0.1500.xxx

5.0.1500.xxx


Dynamics AX 2009 SP1 RU-1

5.0.1500.358

5.0.1500.358

Rollup 1

Dynamics AX 2009 SP1 RU-2

5.0.1500.809

5.0.1500.809

Rollup 2

Dynamics AX 2009 SP1 RU-3

5.0.1500.1313

5.0.1500.1313

Rollup 3

Dynamics AX 2009 SP1 RU-3

5.0.1500.2116

5.0.1500.2116

Rollup 4

Posted in Uncategorized | 3 Comments

Dynamics AX : ‘Group total’ account length and account type in GL

There is a parameter in General ledger module which we have to consider for auto grouping the chart of account for sum-up

1. GL parameters:

This is length of chart of accounts the system should consider while searching for the accounts starting with a prefix (i.e.chart of account of type Group total).

In the above screen shot 6 means that we wish that the 6 digits long chart of accounts are to be considered.

2. Lets create a Group total and total type account.

For verification purpose lets create an account of type “Total” as follows

_1 is a “Total” type account with range 110000 to 199999    .

And create an account of Type “Group total” as follows

1 is a group total account .. therefore the system will totals all the account balances for accounts starting with 1. And we will verify that the balance in both will be equal.

3. Total form gets populated by the system. (as u can see in the following two screen shots)

Any new chart of account added in the series of account starting with 1 will automatically considered in the balance calculation for Group total account “1”

4. For chart of account _1 which is a “total” type account the total consists of balance in the following chart of accounts.

As soon as we calculate the balances for the chart of accounts the system displays the group total balances as per the setup…( in the screen shot 1 and _1 have the same values as both are for all chart of accounts starting with 1

Posted in Dynamics AX, AX2009 | Leave a comment

Invoice journal linked with Purchase order


The following illustration is for showing an organization’s workflow of receiving and posting vendor invoices in an invoice register as un-posted invoices. A reviewer then reviews the un-posted invoices and takes the suitable of action of approving the invoice or rejecting the invoice if the discrepancy is beyond the tolerance.

If the above is tried to be mapped as a simple invoice posting then it is generally asked where in AX , the original vendor invoice amount is recorded and stored.

This area has a potential to build some customization but still I hope the following will help

1. Click Area Page node: Accounts payable -> Purchase Order Details.

Form name: Purchase Order Details

2. Create a new record in the Purchase order .

Form name: Create purchase order

Vendor – “1101”

3. Change Item number from ” to ‘1101’.

4. Change Quantity from ” to ‘1.00’.

5. Change Unit from ” to ‘ea’.

6. Change Item name from ” to ‘High End Speaker – ash/12 inches’.

7. Change Unit price from ” to ‘12.50’.

8. Change Net amount from ‘0.00’ to ‘187.50’.

9. Save the record in the Purchase order 000379 , Name Rain Projectors , Item name form.

10. Make sure the selection is changed in table Purchase orders to:

Purchase order

Vendor account

Invoice account

Purchase type

Status

Currency

Project

Blanket order

Quality order status

000379

1101

1101

Purchase order

Open order

USD


11. Click the Posting -> Packing slip menu button.

Form name: Posting packing slip

12. Change Packing slip from ” to ‘DN_379’.

13. Click the OK button.

14. Close the Purchase order 000379 , Name Rain Projectors , Item name High End Speaker – ash/12 inches form.

At this stage the lets consider that the vendor sends the invoice for the above delivery . The organization’s workflow is such that all the vendor invoices are punched in an invoice register by the front desk for later review and posting by accounts payable section in finance.

15. Click Area Page node: Accounts payable -> Journals -> Invoices -> Invoice register.

Front desk will perform this step

Form name: Journal

16. Create a new record in the Journal form.

17. Change Name from ” to ‘APInvReg’.

18. Change Description from ” to ‘AP Invoice RegistePr’.

19. Click the Lines button.

20. Switch to the Overview tab on the Journal voucher form.

Form name: Journal voucher

21. Create a new record in the Journal voucher form.

22. Change Account from ” to ‘1101’.

23. Change Sales tax group from ” to ‘No-Tax’.

24. Change Invoice from ” to ‘Test4SD’.

25. Change Item sales tax group from ” to ‘ALL’.

26. Change Transaction text from ” to ‘Testing Invoice Posting’.

27. Change Credit from ” to ‘188.00’.

28. Change Purchase order from ” to ‘000379’.

29. Change Approved by from ” to ‘7210’.

30. Click the Post -> Post menu button.

Form name: Infolog

31. Click the Close button.

32. Close the Journal voucher form.

33. Close the Journal form.

34. Click Area Page node: Accounts payable -> Journals -> Invoices -> Invoice approval journal.

This step will be performed by the Account payable section in finance.

Form name: Journal

35. Create a new record in the Journal form.

36. Change Name from ” to ‘APInvApp’.

37. Change Description from ” to ‘AP Invoice Approval’.

38. Click the Lines button.

Form name: Journal voucher

39. Click the Fetch vouchers button.

Form name: Fetch vouchers

40. Make sure the selection is changed in table Journal lines to:

Account

Invoice

Voucher

Transaction text

Approved by

Currency

Debit

Credit

1101

Test4SD

APIR00000052

Testing Invoice Posting

7210

USD


188.00

41. Click the Select button.

42. Click the OK button.

43. Click the Functions -> Purchase order menu button.

Form name: Posting invoice

44. Switch to the Lines tab on the Posting invoice form.

45. Change Unit price from ‘12.50’ to ‘0.00’.

46. Change Net amount from ‘187.50’ to ‘188.00’.

47. Click the OK button.

Form name: Infolog

48. Click the Close button.

49. Close the Journal voucher form.

50. Close the Journal form.

51. Click Area Page node: Accounts payable -> Purchase Order Details.

Form name: Purchase Order Details

52. Make sure the selection is changed in table Purchase orders to:

Purchase order

Vendor account

Invoice account

Purchase type

Status

Currency

Project

Blanket order

Quality order status

000379

1101

1101

Purchase order

Invoiced

USD


The purchase order is Invoiced.

Posted in Dynamics AX, AX2009 | 2 Comments

Dynamics AX2009 Workflow – Checklist


I was going through the the workflow implementation with a client and could notice that there is a need of a check list for consultants users to configure the workflow and make it work . I have thought of the following points for the check list.

1. User options

a. Maintain the email address of the users .

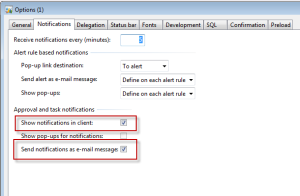
b. Setup The parameters for receiving the notifications on the Notifications tab especially the two marked parameters for getting the notifications in client and or email.


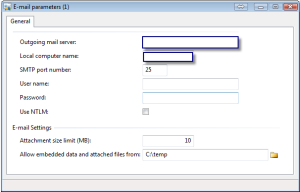
2. Administration>Setup>Email parameters must be setup so that emails can be sent through AX.

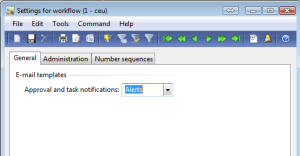
3. Basic>Setup>Setting for workflow>settings for workflow to be used by the system to send workflow emails.

4. Configuration of the email template as identified in step 3 above. Basic>Setup>Email templates. FOr setting templates refer to the AX help file. Its a good source of information.

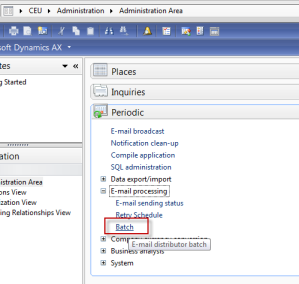
5.  Ensure that the batches to process the alerts and the email messages are active.

      a. Email batches – Administration>Periodic>Email processing> Batch.


     b. Alert batches – Basic>Periodic>Alerts


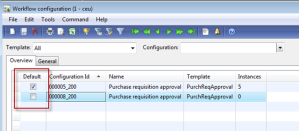
6. Workflow configuration is configured properly . There should one default configuration . Additional configurations may be maintained with specific conditions for becoming active.

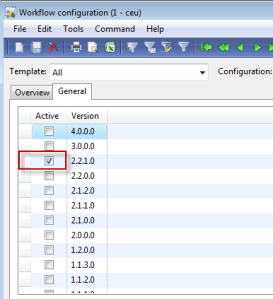
e.g. workflow on purchase requisition may have following setup


One active version per configuration must be maintained.

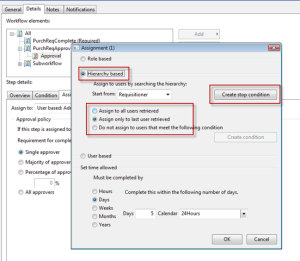
7. Workflow rules should be defined properly. If the tasks are being assigned on hierarchy basis then there must be a stop condition maintained ( This is the general error that users do not maintained a stop condition.)

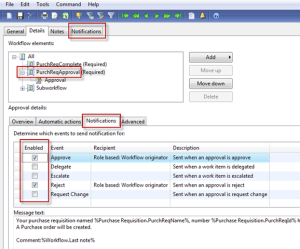
8. Setup events when to generate a notification in an approval process.


I think if above check list is cross checked during setup or troubleshooting most of the errors / problems would be solved related to workflow . For rest of the problems leave them for consultants/developers to investigate on case to case basis. 

Posted in Dynamics AX2009 Workflow | 1 Comment

Dynamics AX 2009 – User group security Profiler.


User group permissions have always been a pain but interesting area in AX (at least for me). The challenge for the Administrators is to find a the appropriate security keys for giving desired permissions to a user group. 

Microsoft has been aware of this pain and as a first step towards providing an aid to locate the security key to be configured, a security profiler tool has been provided. Its not a default part of standard application but a download can be requested from Microsoft support . it will be provided to you in the form of an xpo.This tool is not yet perfect as it sometimes fails to give the desired results. As i said in the beginning that this is the first step in this direction therefore Microsoft recommends that it is used in the TEST environments only and not in any Production/Live environment.

The download cannot be provided here because of the user sign up agreement for confidentiality with Microsoft

Once you have the tool login into the system as an Administrator that has access to all of the forms and reports in the system follow the steps given below to use it. 

1. Import the xpo:

2. Re-launch AX. This step is important because 2 menu items are added to the Administration menu and they won’t show up until AX is reloaded.

3. Under Administration go to Security Profiler.

4. Click the Start Profiling button –- and leave this form open.

5. Navigate to the forms and reports you want to gather security key information about.

e.g. AR>Sales Order details>Posting>Invoice.

6. Click the Stop Profiling button in the Security Profiler window (the same window opened in step #4).

a. A form will open showing you all of the security keys that were hit while you navigated thru the system.

b. To print out the results listed in the report click the Print report button and print the report.

c. To view your existing security profiles click Administration > Security Profile Results(same as point 6a above)

Posted in Dynamics AX, AX2009 | 9 Comments